
Welcome to the TV-b-Gone family! We hope that your new gizmo will bring pleasure to you and those around you. Of course, it’s up to you how you use it, but we hope that you will use your new-found super power for the good of all, and not just switch off every TV you see. Sometimes people are actually watching them, you know! Anyway, enough of my moralizing (I’m a fine one to talk …)
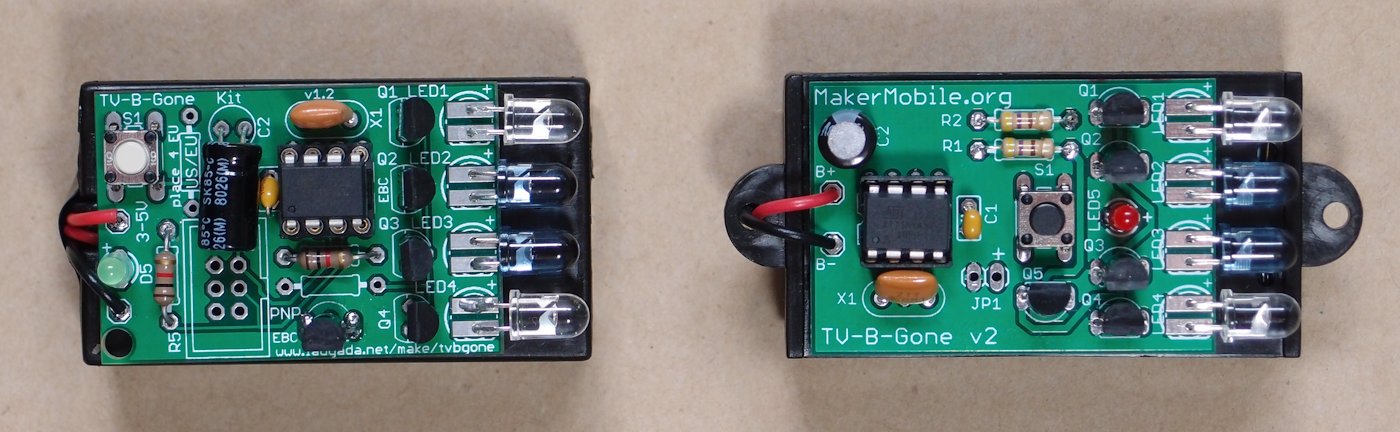
This photo shows the v1.2 hardware as sold by Adafruit and our new v2 hardware
Our version 2 TV-b-Gone has the following modes:
DEFAULT MODE: Push To Transmit (PTT). Codes are only transmitted as long as you hold the button down. Now when you hit your target, you can release the button and not waste any more battery power. This mode is automatically selected when the device is powered on.
Legacy Mode: You click the button once and all codes are transmitted in sequence (just like version 1)
Diagnostic Mode: This is for the advanced B-Goners out there who want to hack their device. Each time you click the button, a single code is transmitted. Each code is marked by a flash of the LED. Every 10th code (there are a lot) is marked by a double-flash in case you lose count. In this way you could for example discover that code number 67 works on a Huangwei TV. So why would you want to know? Well, if Huangwei sells a lot of TVs in your town it might be annoying to have to hold the button down for 20 seconds each time you want to turn one of them off. If you are adept at microcontroller-related stuff, you could change the source code to bring this particular code toward the front of the transmission order. Sweet.
Version 1.2 (Not sold by MakerMobile)
This is a single-mode device. You click the button once, it transmits every code in its database, which takes about a minute. There’s nothing you can do to stop it, other than pulling a battery out. Maker Mobile does not carry this version.
Changing Modes
So how do you change modes, if you don’t want to use the default mode? Simple. When you power-on or reset the device, click the button while the LED is still blinking. Each click of the button cycles through the 3 modes. The mode you have selected is indicated by a single, double or triple flash. When you have dialed in the mode you want, leave it alone for two seconds and the blinking will stop. You’re now in your selected mode.
Resetting/Rebooting
If you want to change modes again, or in the unlikely event that the device is unresponsive, you can reset it by removing a battery, then pressing the button, then reinserting the battery.
Low Battery Warning
The low battery warning is three long flashes. If you see this it’s time to change or charge your batteries. Please recycle your used batteries rather than putting them in your domestic garbage. More and more municipalities and retailers now have recycling programmes.
If you get a low battery warning, the unit will return to its default mode.
Changing Regions
Our standard TV-b-Gone v2 has the full TV code database for North America. There is a universal version that contains some of the North America codes and some of the Euro codes. If you have a universal unit it will be identified as such (and you will probably have requested it specifically). When you power-on the unit it will select its default code database (e.g. North America) unless you are holding the button down when you connect the power, in which case it will boot into its secondary region (e.g. Europe).
There are several reasons why we don’t ship a multi-region version as standard:
1. We have not had a chance to optimize the code transmission sequence for Europe as we have for North America
2. We wanted to have the full North America database rather than a partial one
3. Many of the codes work in both regions anyway.
(Note: on v1.2 units, region selection is by means of a resistor which is either soldered in place or not, so you can’t easily change region after the device is built).
Alternate Power Sources
Don’t use more than 3 AA or AAA batteries to power the device as the microcontroller is damaged by voltages over 5.5V.
People have asked whether they can use a flat lithium-ion battery (like a phone battery) to power the TV-b-Gone. It certainly is possible - there’s a connection point on the PCB for a two-pin jumper (labelled JP1) which could allow a lithium battery to be charged while in the device, however, please note the following:
Lithium batteries can leak or explode if overcharged. If you are not familiar with appropriate methods and specific requirements for charging lithium batteries, please do not attempt this modification. There is no circuitry in the TV-b-Gone to limit charging current or voltage, so the charge management function must be provided externally - either in the form of a charger specifically for lithium batteries which you connect to JP1, or in the battery pack itself. Do not assume that a lithium battery contains charge management circuitry just because you can see a small circuit board inside it. Most do not! Do not leave a TV-b-Gone with a lithium battery to charge unattended, even if it’s connected to a commercial Li-ion battery charger.
The lithium mod results in a device that’s considerably slimmer than standard without adversely affecting the power output. It also means fewer dead batteries get generated (although the battery life of version 2 is much better than version 1 owing mainly to the push-to-transmit mode).
Troubleshooting
In all my years of TV-b-Goning, I’ve only had two problems:
(1) My unit started blinking unfamiliar patterns and sometimes it wouldn’t run at all. It turned out that the contacts inside the switch had become oxidized and were no longer making good contact. My solution was to feed a drop of isopropanol into the switch body (beside the button) and push the button firmly while moving it around from side to side. This seemed to cure the problem completely. Your switch will probably never give you any trouble as it’s a fancy one, but at least you know.
(2) I dropped my TV-b-Gone and one of the resonator leads broke. I was able to both fix it and improve it (i.e. make it stronger) by fluxing the leads and pads on the top side of the board and soldering them on the top side. It meant that solder flowed up and around the legs as well as down onto the pads, making the joint very sturdy. That’s why I now recommend the use of flux on both sides of the PCB and on the legs of the resonator when soldering the resonator in place.
It’s good to put the unit in some kind of housing if you are able, to protect it from knocks, drops and prying eyes …


how does the tv b gone work
The black thing in the middle is a very small computer (called a microcontroller). It has 8k of flash memory where it stores a large number of codes for different brands and models of television. When you press the button down, the computer immediately wakes up from a low-power sleep state and begins sending these codes to the four LEDs on the end. The smaller black things are transistors which amplify the computer’s signal to make it strong enough to drive the LEDs. The infra-red light from the LEDs is invisible to us but visible to the TV. When the TV sees a code which it recognizes as its own, it does what it is told … in this case it switches off! I hope this answers your question - let me know if you have any more!