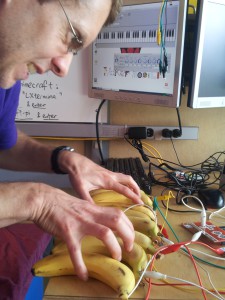
 Recently we ran an event based on MaKey MaKey - the device that lets you connect many everyday objects (including people) to the USB port of a computer so that they can function as surrogate keyboard keys or mouse buttons. The ‘classic’ MaKey MaKey application is the banana piano, where clip leads connect bananas which function as piano keys. Of course, we wanted a banana piano for this event, so I began investigating. My needs were modest, or so I thought:
- Has to work on Raspberry Pi, because those are the computers we have in the MakerMobile.
- Should span a full octave, preferably including black notes.
- Has to sound like a piano, and allow some degree of polyphony.
As I began to research and plan this event, I was horrified to discover that there was no ready-made banana piano that came close to meeting my spec.
Most of the pianos I could find were simple apps created in Scratch. [Incidentally, I couldn't even explore the scratch.mit.edu website (the home of Scratch) from the Raspberry Pi because the site relies on Adobe Flash which is unsupported on the Pi, so I had to peruse them from a Windows PC] These apps ranged from frankly awful (nasty fixed-length beeps) to barely acceptable (four or five white notes with no polyphony). The ones that I managed to download and transfer (on USB stick) to the Pi were just not going to cut it. For starters, the Pi ships with an old version of Scratch and most of what’s on scratch.mit.edu is in a newer, incompatible version. I did find a website with a free converter - one file failed to convert, one succeeded. But the one that I got to run showed that the sound doesn’t work properly in Scratch on the Pi. Apparently this is a well-known issue! So no piano sound at all. Any hope of a ready-to-wear Scratch-based solution was fading fast. The summary so far then:
- Banana pianos are written in Scratch and published on the Scratch website
- The Scratch website is not viewable on a Raspberry Pi, nor on any other stock Linux computer.
- The RPi carries an obsolete version of Scratch, so if you do manage to find and download something you like, chances are it won’t run on the Pi.
- If it does run on the Pi (either it was written a while ago or you were successful in converting it), the sound doesn’t work properly in Scratch on the RPi anyway.
I find this all rather disappointing. Scratch is supposedly the leading programming platform to get kids excited, engaged and sharing their code. Open-source is par for this course and Scratch is developed under the auspices of MIT, yet its Internet home is essentially inaccessible from Linux computers! The Raspberry Pi foundation also has some explaining to do as their mission is very much congruent with that of Scratch, yet, despite making Scratch part of their standard build, it seems they haven’t properly implemented it. Crikey.
I started to think in terms of synthesizer software - something I know nothing about. Some hours were spent downloading and puzzling over various packages before I finally found what I needed:
VMPK - the Virtual MIDI Piano Keyboard
To install:
sudo apt-get install vmpk
VMPK is a keyboard only - it doesn’t produce any sounds. Instead it sends keyboard events to a separate synthesizer program. Luckily for us, the VMPK installation also installs Qsynth which fits the bill quite nicely.
The combination of VMPK + Qsynth runs on the Pi with about 50% processor utilization and produces a really good piano sound from the included soundfont (there are lots of other great sounds to play with as well, both musical instruments and fun sound effects). The rest of this article will describe how these two packages are configured. It will also describe how the standard MaKey MaKey can be tweaked to give a few more keys.
Qsynth Configuration
First, start up Qsynth. You will find it from your start button under Sound & Video. Qsynth takes quite a while to start up… in the meantime all the controls in its window will appear grey.
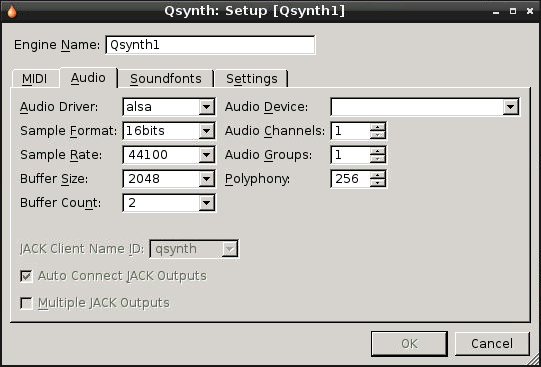
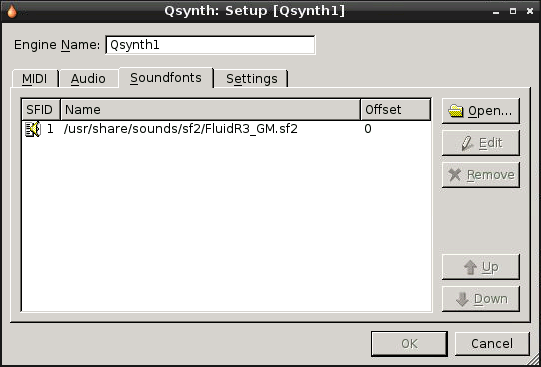
1. Right-click on the Qsynth1 tab at the bottom of the window and select Setup. We are going to adjust the Qsynth1 profile (or “engine” in Qsynth-speak) to work with VMPK and the Raspberry Pi’s sound system.
2. On the MIDI tab, make sure you have the following settings.

3. On the Audio tab, make sure you have the following settings.
4. On the Soundfonts tab, you need to click Open and select the FluidR3_GM.sf2 file. Unless you load a soundfont, your synth will have no voices.
5. Click OK. Qsynth will offer to restart the engine for you - instead say No, then close the program and restart it manually. I found that, in Qsynth, changed settings don’t always take effect unless you restart the program completely.
VMPK Configuration
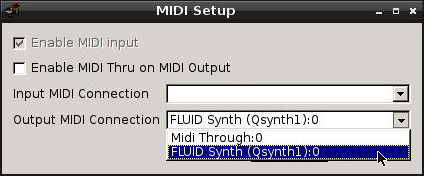
1. Now start VMPK. From the Edit menu, choose Connections and select the Qsynth1 option from the Output MIDI Connection drop-down:
With headphones or external (powered) speakers plugged into the Raspberry Pi’s audio output jack, you should hear piano notes when you mouse-click on the piano keys. Some of your keyboard keys are also mapped to different notes.
The remaining configuration of VMPK is to customize the keyboard mapping to suit the MaKey MaKey.
2. From the Edit menu, select Keyboard Map. I mapped the notes 12 through 29 to the following keys (and I will explain why in just a moment):
W, Z, A, X, S, D, C, F, V, G, B, Up, Down, N, Left, Return, Right, Space.
My white keys are mapped to W, A, S, D, F, G, Up, Down, Left, Right, Space. That’s 11 notes and all these keystrokes are emulated by the MaKey MaKey with stock firmware, so even if I don’t want to tinker with the MaKey MaKey, I have eleven notes to play with. Note that Up, Down, Left and Right refer to the cursor (arrow) keys on the keyboard, not to mouse movements.
My black keys are mapped to Z, X, C, V, B, N, Return. None of these keystrokes is emulated by the MaKey MaKey so if I want to play these notes I have to reprogram the MaKey MaKey (which is straightforward if you’re familiar with Arduino).
Note that you could sacrifice some of the 11 white notes in order to map those keys to black notes instead, but you would end up with much less than a complete octave. The compromise I settled on gives me lots (well, 11!) of white keys and no black keys with a standard MaKey MaKey, and over a complete octave with a reprogrammed MaKey MaKey.
3. After entering your desired key mapping, save the map under a name of your choice. Then, under Edit > Preferences, you can select this key mapping in place of the default. Click OK to save.
4. There’s one more thing we need to do. Without this last change the arrow keys will not produce notes, because they are set up as shortcut keys. So go to Edit > Shortcuts, scroll down till you see Up, Down, Left and Right and delete them (Double click on the offending line and click on the X). UNFORTUNATELY I have found that the shortcut settings are forgotten when the program is shut down and so they have to be changed each time you want to play music on the arrow keys. Ways around this might be to hack a config file somewhere or to reconfigure the MaKey MaKey to send some other keyboard events in place of the arrow keys which are normally mapped to its arrow-shaped inputs.
Back to Black: Modding the MaKey
As noted above, we are using keys emulated by a standard MaKey MaKey to give us over an octave’s worth of white notes. If we want the intervening black notes we will have to reprogram the MaKey MaKey to change its internal key mappings.
1. Navigate to https://github.com/sparkfun/MaKeyMaKey and click on the button at lower right to download a zip of all project files. Open it up on your computer and extract the Firmware / Arduino / makey_makey folder.
2. Start Arduino IDE (I will assume it’s installed and working properly) and open the makey_makey.ino file. A second tab will be present with the settings.h file open. Go in here, edit the key mappings and save the sketch.
For reference, here is my settings.h file. You can see the original mapping (now commented out) and the new mapping:
/*int keyCodes[NUM_INPUTS] = {
  // top side of the makey makey board
  KEY_UP_ARROW,      // up arrow pad
  KEY_DOWN_ARROW,    // down arrow pad
  KEY_LEFT_ARROW,    // left arrow pad
  KEY_RIGHT_ARROW,   // right arrow pad
  ' ',               // space button pad
  MOUSE_LEFT,        // click button pad
  // female header on the back left side
  'w',                // pin D5
  'a',                // pin D4
  's',                // pin D3
  'd',                // pin D2
  'f',                // pin D1
  'g',                // pin D0
  // female header on the back right side
  MOUSE_MOVE_UP,      // pin A5
  MOUSE_MOVE_DOWN,    // pin A4
  MOUSE_MOVE_LEFT,    // pin A3
  MOUSE_MOVE_RIGHT,   // pin A2
  MOUSE_LEFT,         // pin A1
  MOUSE_RIGHT         // pin A0
};
*/
int keyCodes[NUM_INPUTS] = {
  // top side of the makey makey board
  KEY_UP_ARROW,      // up arrow pad
  KEY_DOWN_ARROW,    // down arrow pad
  KEY_LEFT_ARROW,    // left arrow pad
  KEY_RIGHT_ARROW,   // right arrow pad
  ' ',               // space button pad
  KEY_RETURN,        // click button pad
  // female header on the back left side
  'w',                // pin D5
  'a',                // pin D4
  's',                // pin D3
  'd',                // pin D2
  'f',                // pin D1
  'g',                // pin D0
  // female header on the back right side
  'z',      // pin A5
  'x',    // pin A4
  'c',    // pin A3
  'v',   // pin A2
  'b',         // pin A1
  'n'         // pin A0
};
You will notice that I changed the ‘click’ output to send a Return keypress instead. This is because there is no keymapping available in VMPK for the mouse click. Likewise, the mouse movement outputs which are normally on the left-side header (as viewed from the non-component side) have been replaced by the keys Z through N. This gives us more than a full octave, including black notes. W00t!
3. Select Arduino Leonardo under Tools > Board, then connect the MaKey Makey to a USB port and upload the modified firmware. There is also a patch available for the IDE which adds MaKey MaKey as a board type, but I found that I didn’t need it (both boards are based on the same microcontroller). YMMV.
Solder: the Icing on the Cake
To paraphrase a wise man, “My other favourite programming language is solder”…
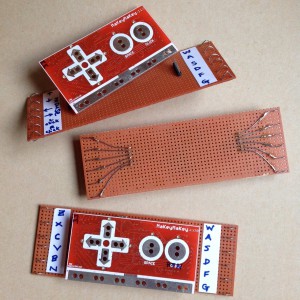
There’s a nice add-on you can make for the MaKey MaKey which allows you to clip test leads to all 12 of the inputs that are found on the left and right-side headers. It’s not essential to have something like this, but it is a help. It looks like this and it only takes a few minutes to make if you’re handy that way:
I’m calling it a MaKey MaKey Breaky Breaky because, well, it’s a breakout board of sorts. If there is interest in something like this I might put it into production…
Pump Up/Down The Volume
Not loud enough? You have three volume controls at your disposal:
1. VMPK has its own volume control. You need to select it from the drop-down in the middle, and then the little knob can be used to adjust it.
2. Qsynth has a master Gain control on the left-hand side.
3. The main system volume control on your Raspberry Pi can be accessed from LXTerminal by typing
alsamixer
Use the up and down arrow keys to adjust, and Esc to exit.
Conclusion
Well, that’s it. I hope this is useful to you. If nothing else, it does prove that it’s possible to get high quality synthesized sound out of the Raspberry Pi, and that there is a much more musical alternative to the garden-variety banana pianos. Have fun and I look forward to hearing about your musical adventures … don’t forget to explore the other instrument voices and sound effects!
= Simon =